How to prepare and use maps for stress-free travel
Using maps is a game-changer for any traveller. They not only help you get around but also let you plan, organize, and remember your trip. Here’s a simple guide to using maps like a pro for your next trip.
Prepare your maps for offline use
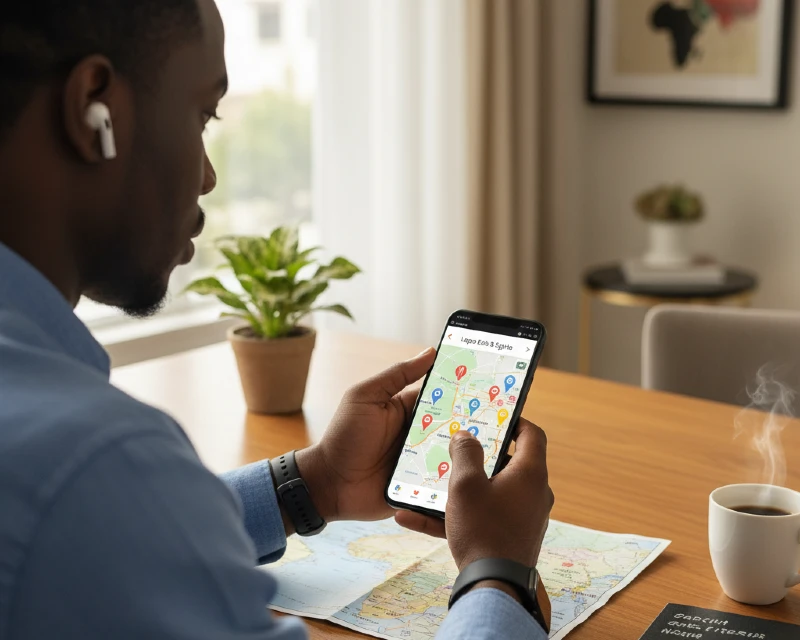
Downloading offline maps is one of the most important steps to ensure you can navigate your destination without an internet connection.
How to download:
- Open the Google Maps app and tap on your profile picture.
- Go to “Offline maps” and select “Select your own map.”
You can then adjust the map to cover the entire area you plan to visit. Download the largest possible area you’ll be travelling through, as this is much more efficient than downloading small, separate maps for each city.
After doing this, ensure you turn on automatic updates. Go to your offline map settings and turn on “Auto-update offline maps” so the maps stay fresh with new road and business information.
Download alternative maps
While popular maps like Google Maps are very efficient, it is limited in some places due to security regulations. For example, in South Korea, Google Maps may not provide turn-by-turn navigation, real-time traffic updates, or accurate walking/public transit directions.
It’s best to research your destination to find out if there are local alternatives you can use. Before your trip, download the local map app and spend some time getting familiar with the interface.
Regardless of the kind of map you choose to use, test your setup before leaving. Turn on airplane mode to verify that your offline and downloaded maps work as you’d expect.
RELATED: Must-have solo travel essentials for a stress-free journey
Create your own trip map
Creating your custom trip map allows you to organise your plans efficiently. You can do this for free on Google My Maps. Although it is primarily used on a desktop, you can view your finished map on the Google Maps mobile app.
Here is a step-by-step guide to get you started:
1 Create a new map
- Go to google.com/mymaps and sign in with your Google account.
- Click the “Create a new map” button. A new, untitled map will open.
- Click on “Untitled map” in the top-left to give your map a name and a description for your trip.
2 Add and name layers
- My Maps organizes locations into “layers,” which you can use as categories. Click on “Untitled layer” to rename it.
- You can create layers for different days of your trip (e.g., “Day 1 in Singapore”) or for different categories (e.g., “Dining,” “Shopping”).
- To add a new layer, click the “Add layer” button. You can have up to 10 layers per map.
3 Add places to your map
- Use the search bar at the top to find specific places you want to visit, such as a restaurant or a landmark.
- After searching, a pin will appear on the map. Click “Add to map” in the pop-up window to save it to your selected layer.
- Alternatively, you can click the “Add marker” icon below the search bar to drop a pin on any spot on the map and add a title and description.
4 Customize your map
- For each location you add, you can click on the pin to edit it. Click the “paint can” icon to change its colour or icon to fit a specific category (e.g., a bed icon for hotels, a fork and knife for restaurants).
- Use the notes field in the pop-up window to add extra details like hours of operation, reservation numbers, or personal notes.
- You can also add directions between two points, draw lines or shapes, and change the base map style to a satellite or a simplified version for a cleaner look.
5 View and share your map
- Your map is automatically saved to your Google Drive.
- To access it on your phone, open the Google Maps app, go to Saved > Maps, and you will see your custom map listed.
- To share your map, click the “Share” button in the left-hand panel. You can share it with specific collaborators to plan together or make it public with a shareable link.
6 Back up and export
- Click the three dots next to your map name and export to KML/KMZ.
- Save it to cloud storage or import into another app for offline navigation.
RELATED: How to survive long flights: A practical routine that actually works
Borrow and adapt other people’s maps
You don’t always have to start from scratch. You can take advantage of the detailed work of others and then customize it to your needs. Here’s a step-by-step guide on how to do it:
- Find a map to borrow
You can often find KML/KMZ files by searching for your destination along with the file format. For example: “African food spots Doha kml,” “best cafes in Paris kmz,” “historical landmarks of Rome kml”
- Import the file into Google My Maps
Once you have located and downloaded a KML or KMZ file, you can easily import it into your own custom map.
- Go to google.com/mymaps and either create a new map or open an existing one.
- Select “Import”: Below the map title, click the “Import” button, which is usually found under one of the layers.
- Upload the File: A new window will appear with options to upload a file from your computer or Google Drive. Select the file you downloaded and click “Open.”
- Adapt the imported map
After the file is imported, all the locations will appear as a new layer on your map. You can then:
- Edit and reorganise by moving pins between layers, changing their colors and icons, and editing their titles or descriptions to better suit your needs.
- Merge the imported layers with other layers you have created to unify all your points of interest into a single, organized map.
- Remove unwanted places that are not relevant to your trip.
Use smart navigation gear
Pair your maps with a smartwatch and earbuds to create a hands-free experience that allows you to look more like a local and less like an oblivious tourist.
With earbuds, use one and leave the other ear free for awareness. You could also activate “low volume” or “transparency” mode so you can still hear traffic or people.
Organise saved places for quick reference
Instead of a single “to-do” list, categorize your saved places to make them easy to find and use.
Use Google Maps’ “Saved” feature to create multiple lists. For example: “Paris Cafes,” “Singapore Museums,” or “Kenya Safaris.” This keeps your points of interest neatly organized by location or theme.
For each saved place, add a personal note. This can help you remember key details about the places. You can also add custom labels, which makes places searchable by your own keywords.
While Google Maps has some default icons like a star or a flag, you can create custom maps with Google My Maps and use different icons and colors to visually differentiate locations. For example, a red pin for restaurants, a blue pin for sights, and a green pin for parks.
Plan your daily routes efficiently
Planning a route doesn’t mean you have to follow it rigidly, but it makes sure you see the most important sites without wasting time.
Group places by proximity. Before your trip, look at your saved pins and group them into logical clusters. For example, if you have three museums and a restaurant in the same neighbourhood, you can plan to visit them all on the same day.
Optimize your route. You can manually rearrange stops in Google Maps to create the most efficient path. Add up to 10 stops and then drag and drop them to find the quickest route to minimize travel time and save money on transportation.
Use layers for daily itineraries. With Google My Maps, you can create a new layer for each day of your trip. This helps you visualize your itinerary and ensures you don’t overschedule.
Maps are more than just tools for directions; they’re a way to plan, stay safe, and relive your adventures. With a little prep, you’ll be able to explore confidently.


Leave a Reply